Pages

Friday, 16 March 2012

Applique cushions and thinking of spring

Hello! It's been a while, with college deadlines looming it's been hard to find time to fit anything else in, I can now see why some people blog as a full time job, it would have to be, to write the amount of post's I want to and to make all the things I'd like to blog about. So I thought I'd write a quick post so you don't think I have abandoned you, I haven't honest!

Spring is finally here!! well technically it is but the weather is still all over the place, hot one day, cold the next, but at least the end to the long cold days is in sight, yay! I love this time of year it is full of promise, new beginnings and fresh starts. The bluebells in my front garden are growing nicely and anytime soon I'm sure they will flower, that's when I get really happy, just looking at the sea of bluey purple flowers makes my heart sing :). The only downside is that weeds also love this time of year, now don't get me wrong, I find weeds fascinating. They over come all odds, invasive by nature, spread their seed en masse and grow in even the most hostile of environments, if only the plants you wanted would do the same. As I'm sure everyone does, I detest spending time digging them up only for them to come back again, but I also find beauty in the mundane and worthless. So took it upon myself to document them and make them worthy of a place in my home.


I picked out two plants I found most appealing visually, dandelion and nettle, and made some applique cushions. Preparing the dandelion cushion was nearly as tedious as pulling out the weeds themselves as you will be able to see from the pictures below, I had to cut out every leaf by hand and even did it twice as I couldn't decide what colour to use!


It was worth it though and I like the look of the busy Amy Butler pattern so much I even used it as a banner for my blog. So as you can see weeds don't have to be ugly, troublesome plants, with a bit of imagination, a whole lot of time and patience they can be transformed into beautiful works of art and take pride of place inside the home.


Now for my latest project. I'd like to introduce you to my first seedlings of the year,

from left to right - peas, spring onions, lettuce.

from left to right - rocket, sweetcorn, carrots

I like to start my seeds off early on the kitchen window sill as I like to eat the veg early too! My all time favourite has to be peas, I have to admit none actually made their way into my kitchen last year as I just couldn't resist eating them straight from the plant! I'm also trying somethig new this year, I have never grown sweetcorn before and not sure how it will fare in my windy garden or the climate but I'll let oyu know how it goes.

So for mow I must leave you, I hope you have a great weekend and start to the growing season if thats your kind of thing :)

Laura xx

Wednesday, 29 February 2012

Ombre Cake and Nails

In the past few days I may have become slightly obsessed with Ombre, which is French for graduation. I've been pinning images left, right and centre of all the ombre goodies currently floating around the web, it's good to know it's not only me that has this obsession!

It was my mum's birthday on Tuesday so I had a great opportunity to try out an ombre cake.


I was going for a pinky peachy colour and it came out slightly more orange than I would have hoped but my mum was happy with it and that was all that mattered. Unfortunately we were not able to cut the cake until the evening so the following pictures are a little dark but you will be able to see the look I was going for.


I covered the cake in vanilla frosting and graduated the inside from dark to light, it looked great and tasted even better! Next time I am going to attempt to pipe frosting roses, so watch this space :)


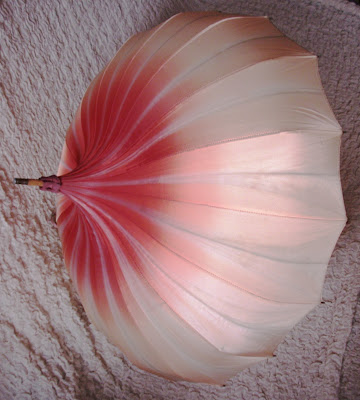
Yesterday to get my ombre needs met, all I had to do was put up my lovely vintage parasol, I found this at a carboot for £2!!! I couldn't believe my luck. There are not really many uses for this, as I don't want it to get damaged by the sun anymore than it already is. So on dark winter days when I am feeling a bit miserable from lack of sunshine, I put on a summer dress and get it out to pretend it's summer :) as long as I don't look out of the window, I can forget it is winter for a couple of hours and cheer myself up!


 Today I had a go at ombre nails, as you can see I need to make the graduation less subtle next time. All you need for this look is a deep colour nail polish, white nail polish, a paper plate, cocktail stick and an old nail polish brush.

Start with the darkest colour on either your thumb or little finger. To do the next finger nail, put a blob of dark polish on the paper plate, add a drop of white and mix with the cocktail stick, apply to the nail with the old brush. Continue with the next nail but this time add 2 drops of white polish to the blob of dark polish, as you do the other nails just add 1 more drop of white polish each time. Sorry not very it's not very precise with blobs and drops but precisness is not needed :)

I hope you are having a great week so far and enjoying the extra day of February we get this year!

Laura xx

Tuesday, 28 February 2012

Protective Tablet PC Case for my Brother

Wow what a busy week last week was. It was the first week back at college after a week off and I'd got quite used to being a lady of leisure. Being able to potter round making things and getting up later than usual was bliss, so it was a shock to the system to resume school runs and go back to college. But I was floating on a cloud of excitement having found out I got into the Decorative Arts course at University I've been wanting to do for a couple of years now!!

Having been a busy week I was a bit strapped for time however I've finally finished my Christmas presents, it's only February so I don't think I've done too badly this year! The last present is a protective case for my brother's tablet PC, I used red and black as they are his favourite colours, with a layer of batting inside to protect it from knocks and bumps.


I was going to do a plain black exterior with red interior but at the last minute decided to mix it up and use the skull and cross bones scraps I had left from making my son a pencil case last year. I'm glad I did as I think it would have looked too plain without the patchwork.


I began by gathering together my materials, making my pattern, then cutting it all out using my trusty rotary cutter. I used iron on interfacing to make the case more sturdy and to give it a crisp finish.


I can't remember where I picked up this tip but it's fantastic for sewing consistently straight lines. Begin by measuring your seam allowance from the needle and place a post it on that line, that's it, simple. Now all you have to do is but your fabric up against the post it as you sew and as long as you have cut your fabric straight, your sewing lines will be straight. As you can see with the second picture by adding more post its you can create a higher surface to but your fabric up against, making it easier to follow. Post its stick really well to the machine and if you want to change your seam allowance just adjust the post it.


I hope he likes it, now all there is to do is wrap up all the presents and give them out. I'll let you know how it goes.

I hope you had a good week end!

Laura xx

Monday, 20 February 2012

Camera Bag for my Sister

Hello, I hope you had a good weekend, I did as the sun was shining bright and I finally finished the camera bag, yay! As I mentioned in my previous post it took a lot longer to finish than I thought it would, so I am just glad to have it done. I like making my own patterns for things which is often why it takes so long but as I see it, once I've made a pattern it's done and I can use it many times, so it is worth it.

I started by measuring my sister's new camera (during a super secret stealth mission), then drawing how I would like it to look including the dimensions it needed to be, then drew and cut out the pattern. Her favourite colour is blue and as I like recycling materials I used a pair of old jeans, a shirt I picked up on one of my charity shop shopping sprees and one of my Amy Butler fat quarters. I wish I had taken some pictures while making it to show you my process but I was so wrapped up in the actual making, the thought didn't enter my mind until afterwards. I apologise for the pictures the choices were dark or bright and blurry! So here are the best ones.

 
 I love this Amy Butler fabric, it is so playful and cheery, perfect for taking out on a spring/summer day. I think it also goes really well with the denim, which I chose for its durability, a must when carrying a precious camera. It also has an adjustable strap so she can choose what length she wears it.


Inside is a turquoise lining which I quilted using a double layer of batting to ensure the camera is protected against knocks and bumps. It also has an internal pocket to hold an extra lens when she buys one and as you can see the camera fits perfectly! I made bias binding from the Amy Butler fabric using this fantastic tutorial by creative little daisy as I don't own a bias tape maker, I really struggled attaching the binding but glad I'm persisted as it brings the bag together and ensures nice neat edges.

  
On the back I put in a zip pocket to hold any other little bits she needs to carry with her and on the inside of the flap I embroided her name to make it more personal. I'm sure you will agree that my embroided text has got a lot neater. After my attempt on the purse for my other sister I have been practicing!

That's two presents down, one to go which is a present for my brother I am going to start tonight. Then it's wrapping them up to give out, the best bit :)

Tip of the day: If you are very jumpy like me, put your mobile phone on silent while doing your make-up! It took me a long time to implement this one but after poking myself in the eye with my mascara wand for the millionth time (maybe exaggerating slightly) when a text came through I now put it on silent daily :)

I hope you are having a good start to the week!

Laura xx

Friday, 17 February 2012

Craft Room

Well I intended on posting about the camera bag I am making for my sister's (late) Christmas present, but it is taking me far longer than I expected (suprise, suprise!). For the last couple of days I have been drafting patterns, falling in love with my rotary cutter and wrestling with bias binding. So to plug the gap I have decided to show you how I created my craft room on a ridiculously tight budget, some help from online and mountains of determination, which went something like this; 'I will have a craft room even if I have no money and have make everything myself!'. So that's what I did, apart from a couple of bookcases I already owned, £10 spent at B&Q and a few things from IKEA, I made my room.


Here is what I started with, a small junk filled room with woodchip on the walls, but it had it's plus points, it gets plenty of natural light and overlooks the garden. I'm sure everyone knows what woodchip wallpaper is, but in case you don't it is the worst wallpaper ever invented, designed to cover even the most terrible walls, that sounds good, right? Wrong, the texture it has really irritates me, I don't know why, I just love nice smooth walls, not ones that are covered in little irregular lumps, it is a nightmare to get of and tiny chips of wood get under your fingernails as you strip it, almost as if it is putting up a fight! But I won the fight, 5 days after starting, a tub of polyfiller (it really does disguise terrible walls), 3 rolls of lining paper and a tin of paint later, ooh nice smooth walls.

But then I had to fill the room with furniture that I didn't have. Luckily I had an old broken wardrobe and my dad kindly donated bits of wood from my brother's old bed. While browsing online for desk tutorials I came across Ana White's website, it's a fantastic website that has tutorials and plans for just about any furniture you want to make, beds, desks, bookshelves, you name it, she can help you make it. All the instructions are free, she estimates how much it will cost and they are all broken down step by step. If you are thinking about making any furniture I'd take a look at this site. So using my stash of power tools (don't you just love power tools? :)), Ana's knowledge and a new found confidence I got to work.


I made the desk, shelves and a shelving unit big enough to fit A2 paper and it also doubles as the 'leg' at the end of the desk, its not quite finished (it only has 3 shelves) but you can see it peeking out from under the desk on the first picture. It's enabled me to store my college work and keep my paper stash flat, when previously it was stood up in one of my cupboards. I love using recycled materials and they no longer look like a wardrobe or a bed thanks to some white spray paint, I now have a large L shaped desk, room for my paper and shelves for my growing collection of art and craft books and crafting supplies. I put up a notice board and a couple of clip boars to keep important information and inspirational images on show. To keep all my pens, pencils, paintbrushes etc organised and handy i used an IKEA rail and hanging baskets, just above my desk.

 
I used small IKEA spice jars to organise my growing button collection by colour. Now I know exactly where they are when I need them.


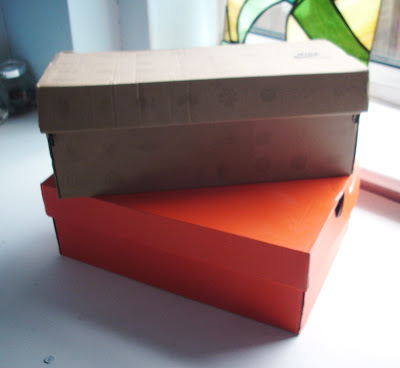
My felting wool, cotton and embroidery thread needed a home and after spending so much time making the room look pretty it seemed a shame to introduce plain old shoe boxes to the room. So I covered them in sheets of wrapping paper. Not only was this inexpensive it also looks great.


Now for the mountain of unorganised fabrics! I found this great tutorial over at Smashed Peas and Carrots (love the name) explaining how to make mini fabric bolts. She uses comic book boards but in the spirit of recycling and keeping costs down, I used several old cardboard boxes cut up into rectangles the right size to fit my shelves and they worked great. Now I have a nice neat fabric stash. I'm still deciding on what to put up at the window, I'm thinking blinds but haven't found the right ones yet.

Right, now I am going to get back to making the camera bag, hopefully I will finish it today so I can show you tomorrow. Wish me luck!

Laura xx


Sunday, 12 February 2012

Christmas Presents, Mollie Makes Coin Purse Kit and Tips of the Day

Ok, ok I know it's February so why am I talking about Christmas presents I hear you ask? Well last year because I was very busy around Christmas (and didn't start making presents until the week before, oops) I gave some of my family I.O.U's with the promise of a fantabulous handmade present. Timeliness has never been one of my strong points but even I would agree it's getting ridiculous now, so yesterday I made a start on the I.O.U's and made a present for my sister. I was struggling to decide what to make for her, I mean what do 16 year old girls want?
This months issue

Mollie Makes to the rescue! In case you don't know what Mollie Makes is, it's a fantastic British lifestyle and craft magazine, printed on high quality matte paper, full of beautiful, inspirational images, interviews with crafters, tutorials and usually includes a small craft kit. I've been a subscriber since issue 2 and wait patiently  run to the door whenever the postman comes just in case it's Mollie Makes time, but have not used any of the craft kits yet. So I decided to make my sister a small coin purse using the craft kit, it contained 2 pieces of fabric to use and a purse clasp.

After reading the instructions at the back of the magazine and cutting out the template, I decided to use a Cath Kidston fabric sample I have had for a couple of years instead of the fabric provided and also line the purse as I didn't think it would look very good if the seams were visible inside. Having never used a purse clasp before I found the instructions lacking slightly and initially I was disappointed at how the end result would have been had I continued following them. So I scrapped the instructions and just did what I thought would be best.


I'm glad I did because what could have been a disaster turned into a pretty little purse I'm sure she will love. 
 
To make it more personal I added a little tag inside, the lettering isn't perfect, but it is legible, just! One present down two to go, hopefully at least one more will be completed this week, so watch this space.

Now onto tips of the day. Almost everyday I give my tip of the day to family and friends, now I am going to start sharing them with you, I bet you're thinking 'tip of the day?'. Well let me explain; these are not your regular everyday tips, they may seem pretty obvious and sometimes irrelevant to you but my motto is 'let me learn the hard way so you don't have to' :) So without further adieu let the tips commence.

Today's tip: Crazy dancing in small spaces can cause injuries! I have the bruises to show for it :)

I Hope you are having a great weekend!


Laura xx

Wednesday, 8 February 2012

Trying something a little different, paper pulp bowls

I have to say I'm surprised I haven't posted about any textile related projects yet, but watch this space with a love of textiles as big as mine there will be some soon!

Anyway on Sunday I mentioned I was going to make some paper pulp bowls, it's not something I would usually do, as I like to make colouful fabricy things, but I had fun making them and they contributed to my latest college project. After experimenting with lots of ways to make them with 'interesting' results I found this tutorial. Cosa Verda makes some stunning bowls using old maps and household waste paper, you should check them out.

So armed with some old bills, an old cardboard box, beetroot leaves (to make the bowls relevant to my college project), tissue paper, varnish and high hopes, I got to work with my blender and DIY paper making tools. Many hours drying time later I had 2 bowls and sticky hands (I'm too impatient and kept picking them up before the varnish was dry).


Functionality is not the paper bowl's best friend but I'm sure I can find a use for them somewhere around the house, if only to fill with the little useful items, hair bobbles, nail files etc that I usually lose. If I made them again I would love to find some vintage books to use as a lining and leave out the beetroot leaves. 

There is something so satisfying and enjoyable about making things from recycled materials, it's amazing what you can do with rubbish and a bit of creativity! Is there anything you enjoy making out of recycled materials? 

They do say one person's trash is another's treasure!

Laura x

Monday, 6 February 2012

Rainbows + Cake = The best cake

What's not to love about rainbows, just seeing an arc of colour in the sky is a magical experience that I will never get bored of. Add rainbows to cake and you get the perfect combination of yummy cake and colour. But what I love to do, is make the rainbow a secret suprise in the cake so when the recipient cuts it they are like 'Wow, I did not expect that!'

So for my sister's 21st Birthday that is exactly what I did, pale pastel colours and butterflies on the outside, crazy rainbow cake on the inside!


I need a better camera but you can still see I decided to do pale blue fondant icing and a cluster of butterflies on the top, as butterflies are her all time favourite thing. You can't see on the picture but the butterflies had a lace pattern embossed into them to make them a little more interesting and I sprinkled the whole cake with edible glitter,


I am terrible at keeping suprises but on this occasion I managed to wait until she cut the cake and found for herself the crazy rainbow middle. Needless to say she was very happy with her cake and I now have many requests for rainbow cake from my family!

Even before icing the layers look great.
 It is suprisingly easy to do, the only downside is that with only 2 cake tins, 6 layers takes quite a while to cook, but the end result is more than worth it. Have you ever received or made a rainbow cake?

Laura x

Sunday, 5 February 2012

Snow!

I love snow! How magical is it to wake up and see everything under a blanket of snow? It makes the freezing cold winter days much more bearable and adds a bit of excitement to mundane days. I can't wait for my son to come back later so we can make snowmen together (I've wanted to go out all day and make one myself but it would be a bit unfair to hog all the snow!). So for now I am going to stay in my nice cozy house and make some paper pulp bowls, I'll let you know how they turn out.

Laura x

Wednesday, 1 February 2012

Let there be light, My Origami Lampshade!

Over the weekend (although I had many more important things to do!) I felt the need to make something from the origami globe I made last year. I really enjoyed folding this map and loved how folding the paper transforms a 2D map into a 3D globe, it was such a waste to leave it sat on a shelf. So I took the metal fitting from a small lampshade that has been laying around waiting to be put up for ages and turned it into a lampshade. 


I'm really pleased with it and wish I'd thought of it sooner. The support inside makes the folds and map so much more visible than when it was collapsed on the shelf and it gives out a soft glow when illuminated. I'm thinking I may put it in the hallway when decorated but for now it takes pride of place in my living room. I always make things for other people and kind of neglect my house so I think one of my goals this year is to make more things for me and make this house into a home.

Laura x

Friday, 27 January 2012

So here goes... and a sneak peek at my Craft Room

After many many months of trying to think of a name for my blog I've finally settled on Mitten Pie. In case you were wondering there is no specific reason behind it other than I like the sound of it and the image that pops into my head when I say the name makes me laugh to myself!

When I'm not at college I spend my days avidly reading other people's blogs, searching the web and looking through pintrest until I become so in awe at other people's creative pursuits I have to make my own. Now I finally have a place to document them and share the things that inspire me from all over the web and the world around me.

So to end this short first post I'll leave you with before and after pictures of the room I can usually be found; my very own craft room!

Laura x